
We learned how to make a basic Spring MVC application in our previous post, and now we are ready to take it a little further by connecting it with our MySQL database. We will use the JDBCTemplate to integrate database with our Spring App.
Below are the project structure and java files that we made in our last post.

AppConfig.java
package com.codekru.config;

import org.springframework.context.annotation.ComponentScan;
import org.springframework.context.annotation.Configuration;
import org.springframework.web.servlet.config.annotation.EnableWebMvc;

@EnableWebMvc
@Configuration
@ComponentScan( basePackages = {"com.codekru.controller"})
public class AppConfig {

}
ServletInitializer.java
package com.codekru.config;

import org.springframework.web.servlet.support.AbstractAnnotationConfigDispatcherServletInitializer;

public class ServletInitializer extends AbstractAnnotationConfigDispatcherServletInitializer{

	@Override
	protected Class<?>[] getRootConfigClasses() {
		return new Class<?>[0];
	}

	@Override
	protected Class<?>[] getServletConfigClasses() {
		return new  Class<?>[] {AppConfig.class};
	}

	@Override
	protected String[] getServletMappings() {
		return new String[] {"/"};
	}

}
HelloController.java
package com.codekru.controller;

import org.springframework.stereotype.Controller;
import org.springframework.web.bind.annotation.RequestMapping;
import org.springframework.web.bind.annotation.ResponseBody;

@Controller
public class HelloController {

	@RequestMapping("helloWorld")
	@ResponseBody
	public String helloWorld() {
		return "Hello World";
	}
}
We will now connect the above application with a database in simple steps.
- Adding dependencies
- Connecting to a database
- Creating a DAO( Data Access Object ) class
- Finally, Saving an object into the database
Adding dependencies
We will be using the MySQL 8.0.22 database in our application, but you are free to use your choice of database.
So, first, let’s add the below dependencies in our pom.xml
		<dependency>
			<groupId>org.springframework</groupId>
			<artifactId>spring-jdbc</artifactId>
			<version>${spring.version}</version>
		</dependency>

		<!-- MySQL connector java -->
		<dependency>
			<groupId>mysql</groupId>
			<artifactId>mysql-connector-java</artifactId>
			<version>8.0.22</version>
		</dependency>
Your final pom.xml with all your dependencies will look like the below:
<project xmlns="http://maven.apache.org/POM/4.0.0"
	xmlns:xsi="http://www.w3.org/2001/XMLSchema-instance"
	xsi:schemaLocation="http://maven.apache.org/POM/4.0.0 https://maven.apache.org/xsd/maven-4.0.0.xsd">
	<modelVersion>4.0.0</modelVersion>
	<groupId>com.codekru</groupId>
	<artifactId>demo</artifactId>
	<version>0.0.1-SNAPSHOT</version>
	<packaging>war</packaging>
	<properties>
		<java.version>1.8</java.version>
		<spring.version>4.1.5.RELEASE</spring.version>
	</properties>
	<dependencies>
		<!-- Servlet API -->
		<dependency>
			<groupId>javax.servlet</groupId>
			<artifactId>javax.servlet-api</artifactId>
			<version>3.1.0</version>
			<scope>provided</scope>
		</dependency>

		<!-- Spring Core -->
		<dependency>
			<groupId>org.springframework</groupId>
			<artifactId>spring-context</artifactId>
			<version>${spring.version}</version>
		</dependency>

		<!-- Spring MVC -->
		<dependency>
			<groupId>org.springframework</groupId>
			<artifactId>spring-webmvc</artifactId>
			<version>${spring.version}</version>
		</dependency>

		<dependency>
			<groupId>org.springframework</groupId>
			<artifactId>spring-jdbc</artifactId>
			<version>${spring.version}</version>
		</dependency>

		<!-- MySQL connector java -->
		<dependency>
			<groupId>mysql</groupId>
			<artifactId>mysql-connector-java</artifactId>
			<version>8.0.22</version>
		</dependency>

	</dependencies>
	<build>
		<finalName>demo</finalName>
		<plugins>
			<plugin>
				<groupId>org.apache.maven.plugins</groupId>
				<artifactId>maven-war-plugin</artifactId>
				<version>3.3.1</version>
				<configuration>
					<failOnMissingWebXml>false</failOnMissingWebXml>
				</configuration>
			</plugin>
			<plugin>
				<groupId>org.apache.maven.plugins</groupId>
				<artifactId>maven-compiler-plugin</artifactId>
				<version>3.1</version>
				<configuration>
					<source>1.7</source>
					<target>1.7</target>
				</configuration>
			</plugin>
		</plugins>
	</build>
</project>
Connecting to a database
- Add a DataSource bean with the database connection details in the Spring configuration class. We will be using the AppConfig class created in this post. There is also source code at the end of this project, so you can always take a look from there.
	@Bean
	public DataSource dataSource() {
	 DriverManagerDataSource dataSource = new
	DriverManagerDataSource();

	 dataSource.setDriverClassName("com.mysql.jdbc.Driver");
	 dataSource.setUrl("jdbc:mysql://localhost:3306/codekru");
	 dataSource.setUsername("root");
	 dataSource.setPassword("root");

	 return dataSource;
	}
- Now, add a JdbcTemplate bean in the Spring Configuration class, taking DataSource as an argument :
	@Bean
	public JdbcTemplate jdbcTemplate(DataSource dataSource) {
	 return new JdbcTemplate(dataSource);
	}
The whole class will look like the below:
package com.codekru.config;

import javax.sql.DataSource;

import org.springframework.context.annotation.Bean;
import org.springframework.context.annotation.ComponentScan;
import org.springframework.context.annotation.Configuration;
import org.springframework.jdbc.core.JdbcTemplate;
import org.springframework.jdbc.datasource.DriverManagerDataSource;
import org.springframework.web.servlet.config.annotation.EnableWebMvc;

@EnableWebMvc
@Configuration
@ComponentScan( basePackages = {"com.codekru.controller"})
public class AppConfig {

	@Bean
	public DataSource dataSource() {
	 DriverManagerDataSource dataSource = new
	DriverManagerDataSource();

	 dataSource.setDriverClassName("com.mysql.jdbc.Driver");
	 dataSource.setUrl("jdbc:mysql://localhost:3306/codekru");
	 dataSource.setUsername("root");
	 dataSource.setPassword("root");

	 return dataSource;
	}

	@Bean
	public JdbcTemplate jdbcTemplate(DataSource dataSource) {
	 return new JdbcTemplate(dataSource);
	}

}
Well, how does the above code works? Using the above code, a connection to a database named codekru will be made using the username and password. A JdbcTemplate bean is a Spring object that provides convenient methods to query a database using JDBC. It uses the previously defined DataSource bean. We will use the JdbcTemplate bean from our DAO classes.
Creating a DAO( Data Access Object ) class
- Create another package named “com.codekru.dao” by right-clicking the project folder
- Create a class in the same package called “TitleDAO“
- Annotate the class with @Repository annotation
package com.codekru.dao;

import org.springframework.stereotype.Repository;

@Repository
public class TitleDAO {


}
- Add an autowired JdbcTemplate field to it
package com.codekru.dao;

import org.springframework.beans.factory.annotation.Autowired;
import org.springframework.jdbc.core.JdbcTemplate;
import org.springframework.stereotype.Repository;

@Repository
public class TitleDAO {

	@Autowired
	JdbcTemplate jdbcTemplate;

}
@Repository allows the TitleDAO class to be automatically discovered and instantiated as a bean. @Autowired is used for dependency injection as jdbcTemplate is defined in AppConfig class previously, and using autowired annotation, we can directly use this bean and its methods in our DAO class.
Note: Please add this dao package name to the ComponentScan list in the AppConfig class. So, now it will look like below:
@ComponentScan( basePackages = {“com.codekru.controller”,”com.codekru.dao”})
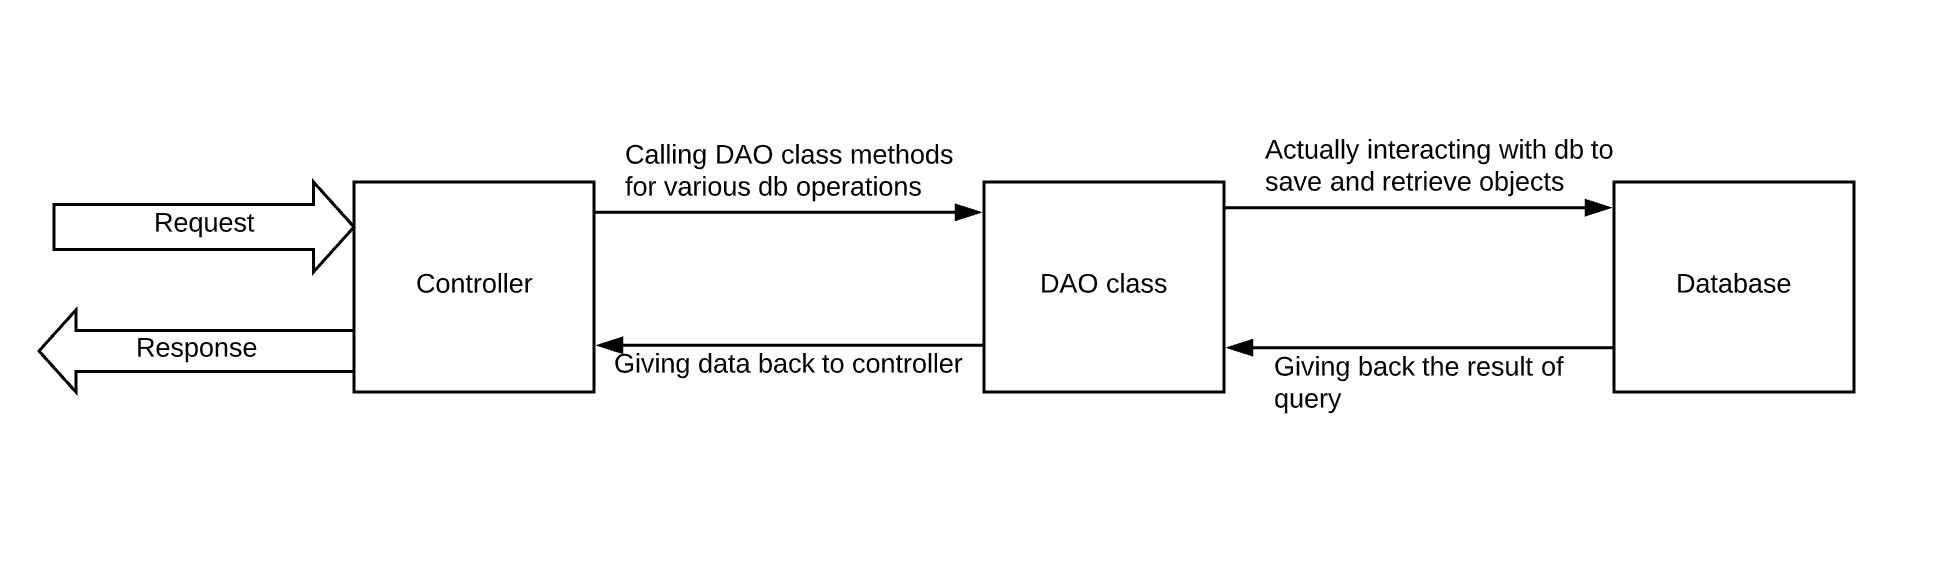
We will be interacting with the database as shown below:
Saving an object into the database
- Create a new package “com.codekru.model“
- Create a model class named Title with private fields as shown below. We will create some “getters” and “setters” methods too
package com.codekru.model;

public class Title {

	private int id;
	private String titleName;
	private String description;

	public int getId() {
		return id;
	}

	public void setId(int id) {
		this.id = id;
	}

	public String getTitleName() {
		return titleName;
	}

	public void setTitleName(String titleName) {
		this.titleName = titleName;
	}

	public String getDescription() {
		return description;
	}

	public void setDescription(String description) {
		this.description = description;
	}

}
- Create a matching table in the database (please create database first, if not created yet)
CREATE TABLE `title` (
 `id` int(11) AUTO_INCREMENT,
 `title_name` text,
 `description` text,
 PRIMARY KEY (`id`)
)
- Define a SQL insert query with question marks as placeholders for the actual row values. Use the update() method to execute the query using the actual values from the object. Now, our DAO class will look like below:
package com.codekru.dao;

import org.springframework.beans.factory.annotation.Autowired;
import org.springframework.jdbc.core.JdbcTemplate;
import org.springframework.stereotype.Repository;

import com.codekru.model.Title;

@Repository
public class TitleDAO {

	@Autowired
	JdbcTemplate jdbcTemplate;

	public void add(Title title) {
	    String sql = "insert into title (title_name, description) values (?, ?)";
	    jdbcTemplate.update(sql, title.getTitleName(),title.getDescription());
	}
}
You might have noticed that we haven’t opened any database connection, yet data will be inserted using the above code. This is because jdbcTemplate takes care of the boilerplate code, like opening and closing the database connection. So, we don’t have to worry about it here.
- Create a controller class named “com.codekru.controller” and add an autowired titleDAO bean, similar to what we did with jdbcTemplate in titleDAO class.
package com.codekru.controller;

import org.springframework.beans.factory.annotation.Autowired;
import org.springframework.stereotype.Controller;

import com.codekru.dao.TitleDAO;

@Controller
public class TitleController {

	@Autowired
	TitleDAO titleDAO;

}
- Now, we will be creating a method in the controller class too which will interact with the DAO class method to save the title object into the database. See the above diagram to know the request flow coming to the controller.
package com.codekru.controller;

import org.springframework.beans.factory.annotation.Autowired;
import org.springframework.stereotype.Controller;
import org.springframework.web.bind.annotation.RequestMapping;
import org.springframework.web.bind.annotation.ResponseBody;

import com.codekru.dao.TitleDAO;
import com.codekru.model.Title;

@Controller
public class TitleController {

	@Autowired
	TitleDAO titleDAO;

	@RequestMapping("saveTitle")
	@ResponseBody
	public String saveTitle() {
		Title title = new Title();
		title.setTitleName("Connecting mysql with spring");
		title.setDescription("This will tell you how to connect with databases in a spring project");
		titleDAO.add(title);
		return "title name which is saved is "+ title.getTitleName();
	}

}
And that’s it. We are done. Now, build your code, run it, and go to this URL http://localhost:8080/demo/saveTitle. The data will be saved in the table. You can also see various CRUD operations in our next post.
Or you can also look at the code in our GitHub repository.
We hope that you find this post helpful. Please write to us at admin@codekru.com or below in the comments for any queries.